Ceiling Grid Installation Guide
Whether you’re building new or remodelling, installing a ceiling grid is an essential step in producing a clean and aesthetically pleasing ceiling that enhances the design and functionality of any area. This thorough tutorial will walk you through every step of the installation procedure, from comprehending the various grid kinds to resolving typical issues. You can install a ceiling grid in a seamless and durable manner by following these directions and utilising the right equipment and materials.
Types of Ceiling Grids
Get familiar with the many kinds of ceiling grids that are available before beginning the installation procedure. Suspended exposed grids 15mm wide and 24mm wide are the 2 most popular varieties. For commercial buildings, exposed grids are a popular option because of their ease of installation and versatility. Contrarily, concealed grids offer a more streamlined and attractive appearance. A distinctive architectural element, suspended grids give any space a floating appearance that draws the eye. Selecting the best grid for your purposes will be easier if you are aware of the advantages and disadvantages of each type.
Tools and materials needed for the installation
The proper tools and materials must be on hand for the installation to go well. Among the tools you’ll need are a screwdriver, tin snips, a drill, a level, a chalk line, and a measuring tape. Furthermore, materials like main and cross tees, clips, hanger wires, ceiling panels, and perimeter trims will be required. In order to guarantee lifespan and durability, you must choose high-quality tools and supplies. Purchasing all necessary materials in advance will enable you to minimise disruptions and save time as you work on the project.
Preparing the workspace
You must correctly configure the workstation before starting the installation process. Everything that can hinder the installation process could be removed from the area, including furniture, fixtures, and trash. Ensuring that the ceiling surface is clean and devoid of debris is also crucial. Ensure you take the necessary safety precautions when installing any plumbing or electrical equipment in the ceiling. You are capable of doing quality work and ensuring a smooth installation.
Measuring and marking the ceiling for grid placement
Installing a ceiling grid requires precise lines and accurate dimensions. First, measure the room’s length and width to establish the grid pattern. To guarantee precision, use a level and a measuring tape. After you have the measurements, mark the location of the main and cross tees on the ceiling. This step will ensure precise grid alignment and walk you through the installation procedure. To prevent any mistakes that could detract from the completed ceiling’s overall beauty, take your time when doing this stage.
Installing the Perimeter Trim
Place perimeter trim around the ceiling grid’s margins to support the ceiling .To start, measure each wall’s length and cut the trims accordingly. To precisely cut the trims, use tin snips. To fasten the trims to the wall use screws. The remainder of the grid will rest on the perimeter trim. To guarantee a tidy and expert finish, take your time when performing this step.
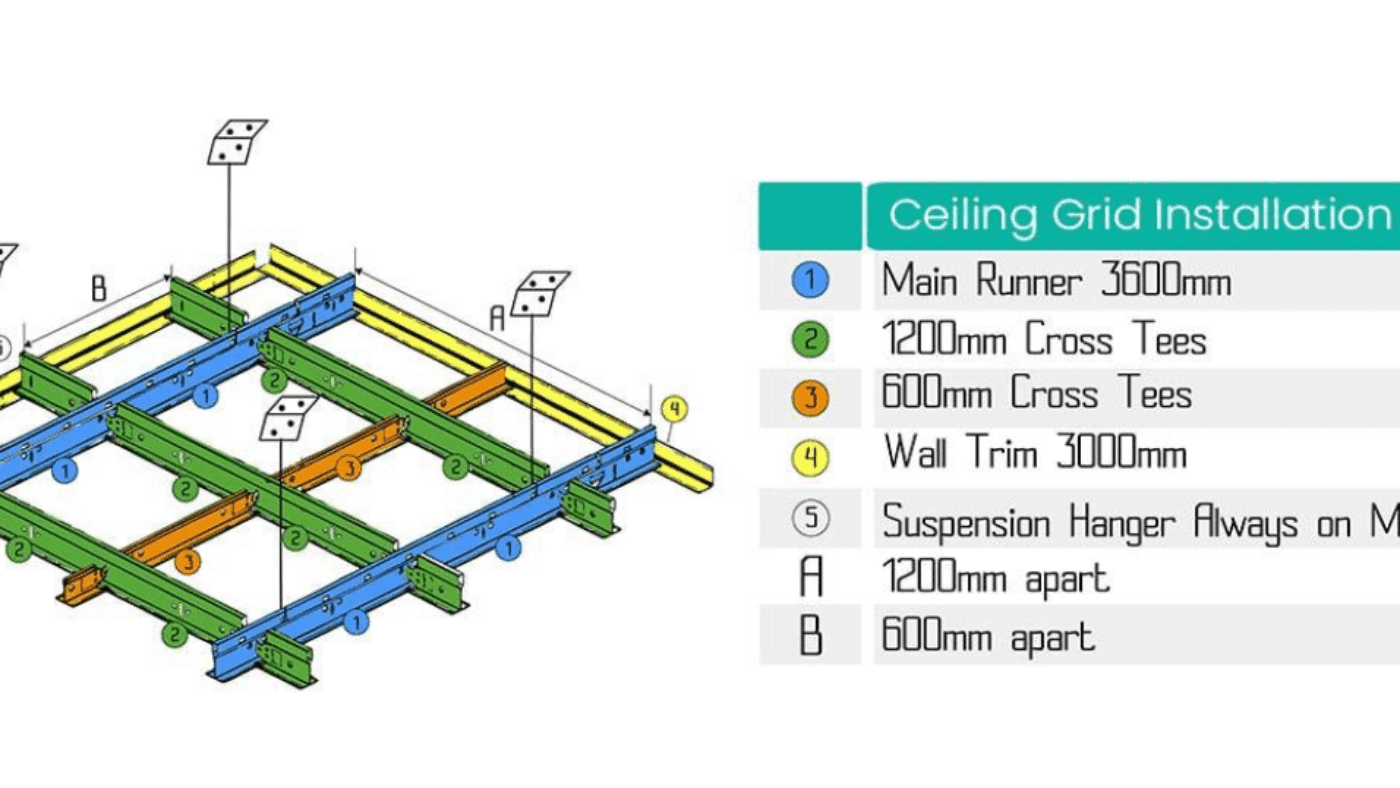
Installing the Main Tees and Cross Tees
The cross tees add extra support and design the grid pattern, while the main tees serve as the ceiling grid’s main structural support system. As you install the main tees, make sure they line up with the previously marked areas along the longest walls in the room. Use screws and a drill to fasten the main tees hanging wire and brackets to the ceiling. After that, place the cross tees the opposite way to the main tees, keeping the proper distance between them as indicated by the grid design. The cross tees lock into the main T. To guarantee a strong and aesthetically pleasing ceiling grid, this stage demands accuracy and close attention to detail.
Installing the ceiling tiles
It’s time to install the ceiling tiles once the grid and perimeter trims are in place. Measure the ceiling tile measurements around the perimeter as they are likely to be less than a full tile size and cut them to fit inside the grid. Make sure to securely seat each panel by carefully lifting it into its designated spot within the grid. To guarantee correct installation, adhere to the manufacturer’s instructions. Continue installing the panels until they cover the entire ceiling. Ensure that you align the panels appropriately to create a symmetrical and attractive effect.
Troubleshooting common issues
There are a few frequent installation-related problems that could lower the ceiling grid’s overall quality. These problems can be loose perimeter trim sagging panels, irregular spacing, or misaligned grid portions. To guarantee a polished outcome, you must take immediate action if you encounter any of these issues. To ensure accuracy, double-check your markings and dimensions. Use a level to correctly align the grid. Adjust any drooping panels and tighten any loose wires or screws. You can accomplish a faultless ceiling grid installation by resolving these problems as they appear.
Maintenance and Care for Ceiling Grids
It is essential to properly maintain and care for the ceiling grid after installation. Maintaining a dust- and dirt-free grid requires routine cleaning. To get rid of any debris, use a soft cloth or hoover with a brush attachment. Avoid using abrasive cleaners and aggressive scrubbing as they can damage the grid and panels. Repairing any panels that eventually break or become discoloured is crucial to maintaining the ceiling’s overall beauty. Your ceiling grid can last a long time if you do routine maintenance and take quick action when something goes wrong.
A Flawless Ceiling Grid Awaits
It takes meticulous planning, accurate measuring, and attention to detail to install a ceiling grid. You can create an expert and eye-catching ceiling by learning about the different grid types, assembling the required equipment and supplies, and adhering to the detailed installation instructions. In order to extend the lifespan of your ceiling grid, don’t forget to diagnose any potential problems and carry out routine maintenance. You can build a gorgeous ceiling that improves the overall aesthetics of any place with the appropriate strategy and materials.
Visit Granmore for high-quality ceiling grid and ceiling tile per square metre.